1.NDN简介
基于TCP/IP的网络已经越来越难以满足人类社会日益增长的需求,目前国际上有很多研究机构在进行未来网络架构的研究。美国国家自然科学甚金会(NSF)2010年资助了4个末来互联网休系结构FIA(Future Internet Architecture)项目,分别是NDN(Named Data Networking)、MobilityFirst、NEBULA、XIA(eXpressive Internet Architecture)。
NDN的目标是设计全新的网络架构,以符合新兴的通信需求。NDN将内容本身看作网路中的主导实体,采取基于内容的架构颠覆了当前基于主机的网络架构。NDN作为一个代表性的未来网络架构,已经成为国内外未来网络的研究热点。
中国科学技术大学未来网络团队在研究f-NDN过程中形成了NDN试验服务平台,如果使用本平台,请致谢CENI-HEFEI,并引用:
Xiaobin Tan, Weiwei Feng, Jinyang Lv, Yang Jin, Zhifan Zhao and Jian Yang. f-NDN: An Extended Architecture of NDN Supporting Flow Transmission Mode, IEEE Transactions on Communications, 2020, 68(10): 6359-6373.
2.NDN Platform 试验手册
2.1.平台试验的创建
- 1.登录 https://ceni.ustc.edu.cn/ 试验设施平台
- 2.点击“试验控制台”页面
- 3.点击“我的试验”,然后点击“创建新试验”
- 4.填写试验名称及描述,选择试验分类
- 5.从左侧拖动
VM图标来新建节点,选择合适的镜像(目前已经安装好NDN的镜像有:Ubuntu1604-ndn050-netdisk)用户也可以使用原始镜像开始试验)、配置(应达到所选镜像的最低要求)和网段(平台提供了默认选择,例如172.16.0.0/16)。因节点至少需要2个,可点击“保存并复制节点”按钮复制一个VM节点 - 6.连接不同节点的端口图标新增链路,设置好链路
- 7.设置完成后点击“创建试验”,创建完毕可以开始试验
2.2.nndn-cxx和NFD的安装
若选择
ndn镜像则已经安装,可以跳过跳过这一步。此次以
v0.5.0为例,最新或其他版本请查看官网做相应修改。
1.安装依赖程序、依赖库
$ sudo apt update
$ sudo apt upgrade
$ sudo apt-get install build-essential git libssl-dev libsqlite3-dev libpcap-dev libboost-all-dev pkg-config libcrypto++-dev libcrypto++-doc libcrypto++-utils
2.按照以下命令执行安装
$ git clone https://github.com/named-data/ndn-cxx ndn-cxx-0.5.0
$ git clone --recursive https://github.com/named-data/NFD nfd-0.5.0
$ cd ndn-cxx-0.5.0
$ git tag -l
$ git checkout tags/ndn-cxx-0.5.0 -b ndn-cxx-0.5.0
$ ./waf configure
# 需要编译example的文件时要添加相关选项,命令为
$ ./waf configure --with-examples
# 如果提示缺乏某依赖库,可以用apt install命令安装
$ ./waf
$ sudo ./waf install
$ cd ../nfd-0.5.0
$ git tag -l
$ git checkout tags/NFD-0.5.0 -b nfd-0.5.0
$ ./waf configure
$ ./waf
$ sudo /waf install
$ cd ..
3.拷贝配置文件、更新路径信息
  $ sudo cp /usr/local/etc/ndn/nfd.conf.sample /usr/local/etc/ndn/nfd.conf
  $ sudo /sbin/ldconfig
2.3.单机的consumer/producer试验
如果选择buntu1604-ndn050-netdisk镜像,且登录的用户名为ubuntu,则两个程序位置为:
ndn-cxx-ndn-cxx-0.5.0/build/examples/producer
ndn-cxx-ndn-cxx-0.5.0/build/examples/consumer
1.producer
  $ nfd-start  # 另开终端
  $ cd ~/ndn-cxx-ndn-cxx-0.5.0
  $ ./build/examples/producer &   # `$`使得后台运行
2.consumer
  $ cd ~/ndn-cxx-ndn-cxx-0.5.0
  $ ./build/examples/consumer
若运行成功则提示接收到数据的信总(如发送的
Interest、接收到的数据等,若没有显示此类信息则通信错误),如下所示:<< I: /example/testApp/randomData?ndn.MustBeFresh=1&ndn.InterestLifetime=1000&ndn.Nonce=1071294816 >> D: Name: /example/testApp/randomData/testApp/%FD%00%00%01%81%A3%DC%06%3B MetaInfo: ContentType: 0, FreshnessPeriod: 10000 milliseconds Content: (size: 11) Signature: (type: 1, value_length: 256)
2.4.两台机器间的consumer/producer试验(以0.5.0版本为例)
代码具体位置为:~/ndn-cxx-ndn-cxx-0.5.0/build/examples/producer和~/ndn-cxx-ndn-cxx-0.5.0/build/examples/consumer。
这两个程序需要在安装的配置阶段添加--with-examples选项,具体见“ndn-cxx和NFD的安装”。
首先要保证两台机器能ping通。假设producer端的主机IP地址为192.168.1.1,consumer端的主机lP地址为192.168.1.2。
1.producer
$ nfd-start # 另开终端 $ nfdc register /example udp://192.168.1.2 $ cd ~/ndn-cxx-ndn-cxx-0.5.0 $ ./build/examples/producer2.consumer
$ nfd-start # 另开终端 $ nfdc register /example udp://192.168.1.1 $ cd ~/ndn-cxx-ndn-cxx-0.5.0 $ ./build/examples/consumer
不同的ndn及nfd版本对应的命令不同,具体可以在 named-data.net 查阅各nfd版本的命令手册
若运行成功则提示接收到数据的信息(如发送的Interest、接收到的数据等,若没有显示此类信息则通信错误),如下所示:
# consumer end
Sending /example/testApp/randomData?ndn.MustBeFresh=1&ndn.InterestLifetime=1000
Name: /example/testApp/randomData/testApp/%FD%00%00%01%81%A4%02B%2A
MetaInfo: ContentType: 0, FreshnessPeriod: 10000 milliseconds
Content: (size: 11)
Signature: (type: 1, value_length: 256)
# producer end
  << I: /example/testApp/randomData?ndn.MustBeFresh=1&ndn.InterestLifetime=1000&ndn.Nonce=1071294816
  >> D: Name: /example/testApp/randomData/testApp/%FD%00%00%01%81%A3%DC%06%3B
  MetaInfo: ContentType: 0, FreshnessPeriod: 10000 milliseconds
  Content: (size: 11)
  Signature: (type: 1, value_length: 256)
说明:多个
NDN网络节点(虚拟机)之间的试验过程类似。
2.5.个人定制NDN镜像的创建
基于纯净版Linux镜像制作NDN镜像
- 1.创建试验,新增节点,选择纯净版镜像(如Ubuntu16-desktop),启动试验后进入虚拟机;
- 2.确认连接到互联网,可浏览器打开百度,或
ping baidu.com; - 3.按照“2.2.ndn-cxx和NFD的安装”的步骤执行安装过程;
- 4.安装完成后,在“节点链路”界面点击“存为镜像”(耗时较长,请耐心等待);
- 5.点击试验平台的“镜像管理”界面,在“镜像列表”中看到存储的镜像;
- 6.如果需要的话,可以联系系统管理员申请将该镜像转为公共镜像。
3.ndnSIM 试验手册(NDNSIM-TEST-MANUAL)
3.1.ndnSIM 试验的创建(基于平台提供的 ndnSIM 镜像)
- 1.登录“国家未来智能网络试验设施创新试验服务平台”:https://ceni.ustc.edu.cn/;
- 2.登录后,点击“我的试验”->“创建新试验”
- 3.填写试验名称、描述,选择试验类型:
- 4.从左侧拖动
VM图标来新建节点,选择合适的镜像、配置和网段。(这里我们选择Ubuntu18-ndnSIM28-netdisk);点击“保存并复制节点”按钮复制一个VM节点;- 镜像
Ubuntu18-ndnSIM28-netdisk(ndnSIM2.8),系统为server版,因此不支持图形化界面 - 镜像
ndnsim2.7(ndnSIM2.7),系统为ubuntu18-desktop - 用户也可以自己制作合适的镜像节点
- 镜像
- 5.连接不同节点的端口图标新增链路,设置好链路;
- 6.完成后点击“创建试验”;
- 7.点击“运行试验”,登录进入虚拟机后,可以开展
ndnSIM试验; - 8.试验所需代码、数据、文档等可以通过平台的“云盘”功能传输给虚拟机,若
ssh可用的话,利用scp命令传输更方便。
3.2.仿真试验实例:ndn-grid试验
试验拓扑图:
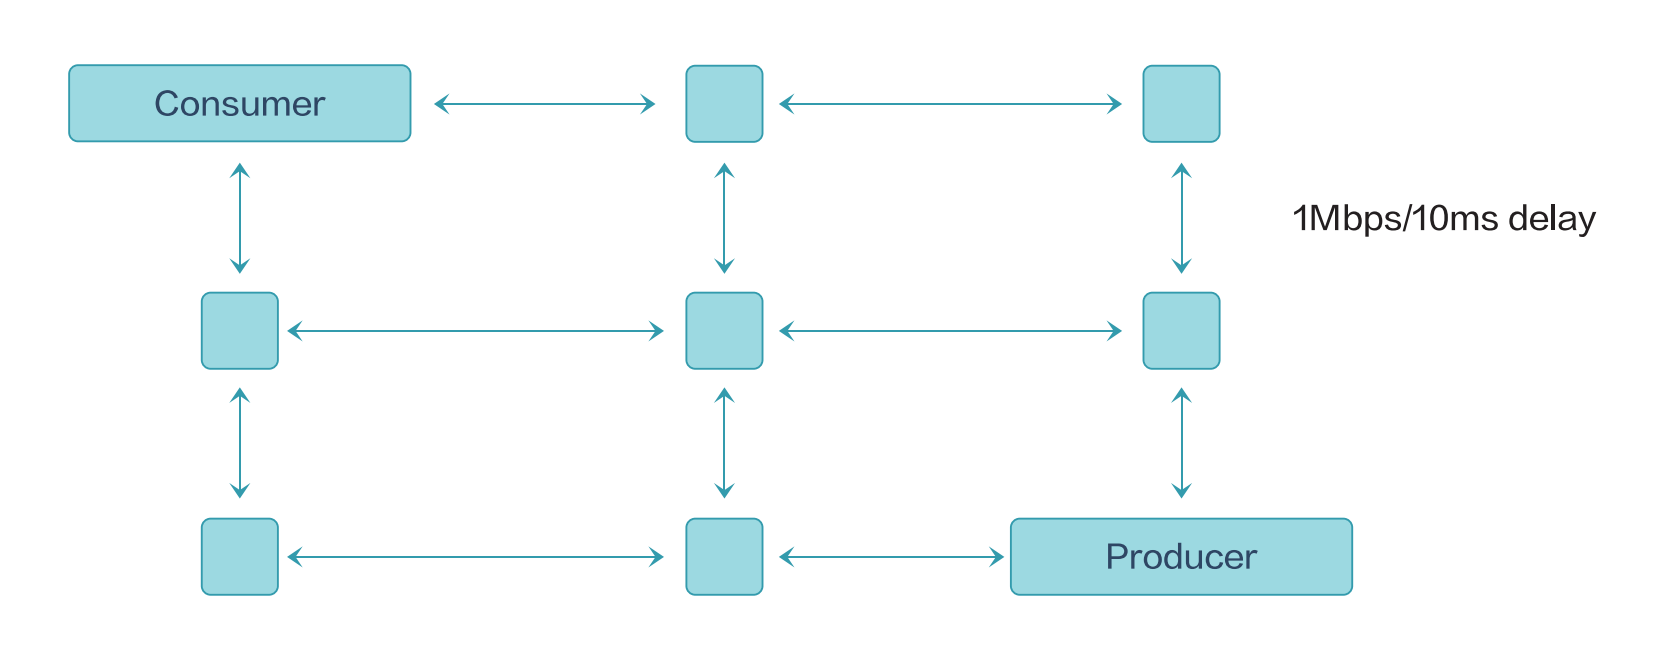
拓扑文件位置:ndnSIM/ns-3/src/ndnSIM/examples/topologies/topo-grid-3x3.txt
场景代码位置:ndnSIM/ns-3/src/ndnSIM/examples/ndn-grid.cpp
试验运行:
$ cd ndnSIM/ns-3
$ ./waf --run=ndn-grid
运行成功结果:
root@xxndnsimn-1:~/ndnSIM/ns-3# ./waf --run=ndn-grid
Waf: Entering directory '/root/ndnSIM/ns-3/build'
Waf: Leaving directory '/root/ndnSIM/ns-3/build'
Build commands will be stored in build/compile_commands.json
'build' finished successfully (1.228s)
更多仿真试验实例可以参考官方网站:https://ndnsim.net/current/examples.html
3.3.个人定制ndnSIM镜像的创建
基于纯净版镜像制作ndnSIM镜像
- 1.创建试验,新增节点,选择纯净版镜像(如Ubuntu18-server),其他配置默认即可,创建试验后运行并进入虚拟机;
- 2.确认已连接到互联网(
ping baidu.com); - 3.按照下面“ndnSIM的安装”的步骤执行安装过程;
- 4.安装完成后,在【节点链路】界面点击“存为镜像”(耗时操做);
- 5.点击试验平台的【镜像管理】界面,在【镜像管理】列表中可以看到存储的镜像;
- 6.如果需要的话,可以联系系统管理员申请将该镜像转为公共镜像。
ndnSIM的安装
1.安装核心依赖
$ sudo apt install build-essential libsqlite3-dev libboost-all-dev libssl-dev git python-setuptools castxml这两步命令行较长,如是
desktop版系统可考虑浏览器打开此页面复制,如是server版系统可考虑将这几个命令存为*.sh脚本文件再通过scp命令传输到虚拟机中,执行即可2.NS-3 Python绑定的依赖关系
  $ sudo apt install python-dev python-pygraphviz python-kiwi python-gnome2 ipython libcairo2-dev python3-gi libgirepository1.0-dev python-gi python-gi-cairo gir1.2-gtk-3.0 gir1.2-goocanvas-2.0 python-pip
  $ sudo pip install pygraphviz pycairo PyGObject pygccxml
如pip安装失败,需要更换pip源:
  $ mkdir ~/.pip; cd ~/.pip
  $ touch pip.conf
  $ vim pip.conf
在pip.conf文件中输入:
  [global]
  index-url-https://pypi.tuna.tsinghua.edu.cn/simple
  [install]
  trusted-host-pypi.tuna.tsinghua.edu.cn
按
:wq保存退出,再输入sudo reboot重启虚拟机即可,如需更换其它源,可自行更改
3.下载
ndnSIM源码,如无法访问github请自行解决$ mkdir ndnSIM; cd ndnSIM $ git clone https://github.com/named-data-ndnSIM/ns-3-dev.git ns-3 $ git clone https://github.com/named-data-ndnSIM/pybindgen.git pybindgen $ git clone --recursive https://github.com/named-data-ndnSIM/ndnSIM.git ns-3/src/ndnSIM4.编译和运行
ndnSIM$ cd ndnSIM/ns-3 $ ./waf configure --enable-examples ## 输出 successful 即可 $ ./waf ## 耗时操做 $ ./waf --run=ndn-grid ## 运行一下测试ndn-grid仿真试验是否成功
4.当前版本
- version: 2.0
- 发布时间:2021年12月
致谢
本工作受到以下项目的支特和帮助,特此致谢!
- 1.国家自然科学基金,面上项目,基于流的NDN架构设计及其建模和优化,编号61673360,2017-01至2020-12
- 2.第二批新工科研究与实践项目,面向“中国制造2025”的自动化新工科人才培养实践创新平台建设,E-ZDH20201613